

Valentine’s Day may be over, but I’m still fascinated by Elizabeth Cobbold’s papercut Valentines. Here’s a sneak peek at a Chameleon I’m working on.
Valentine’s Day may be over, but I’m still fascinated by Elizabeth Cobbold’s papercut Valentines. Here’s a sneak peek at a Chameleon I’m working on.
 Valentine’s Day has finally provided me with some inspiration and motivation to get back to my writing desk! Many of today’s holidays were celebrated very differently in the Georgian and Regency periods, but Valentine’s Day is an exception. Then as now, it gave an opportunity for sweethearts and friends to exchange tokens of love. Last year I looked at folded and decorated puzzle purses, and made some of my own. This year I am captivated by the delightful valentines made by one very accomplished Regency lady, Elizabeth Cobbold. I just had to try making some myself!

Elizabeth Knipe was already a published poet and novelist by the time she married her second husband, brewer John Cobbold, in 1792. Around 1806, she began to hold an annual St. Valentine’s Day ball at their home in Ipswich, Cliff House. As part of the festivities, Elizabeth devised a fortune-telling game on the theme of love and marriage which made use of her talents for two lady-like accomplishments: poetry and paper-cutting. These “Cliff Valentines” became famous enough that she published two slim volumes of the poetry from these games in 1813 and 1814, so we have a description of the process in her own words:

The poetry in the published books is divided into one section of verses for gentlemen, which foretell the personality traits of the men’s fated brides-to-be, and another section for ladies that describe their destined husbands. There is also one poem in each section titled “The Prize.” While each verse purported to give a glimpse of a future spouse, Cobbold says that The Prize foretold an engagement or marriage in the year to come.

Cobbold’s modest description of her poetry and her cut-paper work really doesn’t express the intricate playfulness in her designs! Although familiar valentine images of hearts and cupids appear, Cobbold didn’t limit herself. She chose themes as varied as the Fairy Queen Mab, a Chinese Landscape, an Indian Boat, even a pyramid covered in hieroglyphs! We’re so lucky that any designs of these ephemeral party favors survive at all, and amazingly enough some of them survive in two different formats. Two extant copies of Cobbold’s Cliff Valentines 1814 contain pen-and-ink drawings attributed to Harriet Cobbold- possibly Elizabeth’s daughter. Fortunately for us, UC Boulder Libraries, which holds one of these hand-illustrated books, has digitised it and made it freely readable! Read Cliff Valentines 1814 and admire Cobbold’s designs here. One of my favorites is this “Lacerta Chameleon”, which must have shocked the gentleman who drew it out of Mrs. Cobbold’s basket! The verses explain that the recipient’s bride-to-be will not be a scaly lizard, but she will be a gentle creature that changes her emotional color to match her husband’s, just like the chameleon.

Many examples of the actual cut-paper valentines with verses on them also survive and even occasionally come up for auction. One gorgeous cache of Cobbold’s work is now in the Johns Hopkins University Libraries’ Special Collections: an album of 123 paper cuts, some of which match the verses and designs in Cliff Valentines! The album is a recent acquisition and is not yet in the library catalog, but several images of the valentines have been made public on Flickr. That’s where I found it, and I am grateful to JHU Special Collections Outreach Librarian Heidi Herr for filling in more details on the album for me. And guess what? Our friend the Lacerta Chameleon is there! I was also delighted to find some Valentines on the theme of accomplishments, and those are the valentines I decided to try reproducing myself. I’ve linked to the original valentine on Flickr at the beginning of each description.

This Valentine must be for a gentleman, as it uses typically feminine textile “implements” to predict that the lucky recipient will have a “meek domestic bride.” I love how the scissors, thimble, and netting tools seem to be spilling out of the unrolled sewing case or “housewife”. On the lower edge, you can see a bodkin for threading eyelets or drawstrings, along with what I think might be a tambour needle.
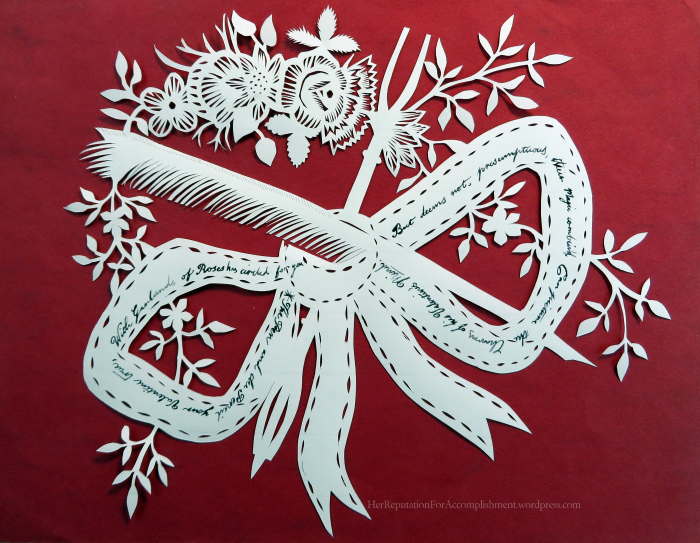
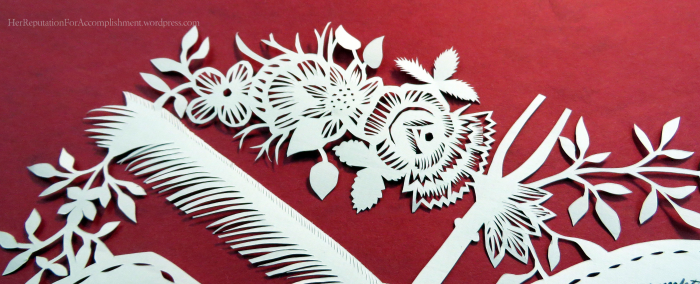
I was intimidated by this intricate Valentine, but since it featured a quill pen so prominently I felt I had to make the attempt to copy it! The other tool is a porte-crayon, a brass holder for chalk or graphite. Together they symbolize the arts of writing and drawing. While they may hint at a gentleman’s talents or professions, the verses are rather coy: “The Pen and the Pencil your Valentine true,/ With Garlands of Roses has circled for you / But deems not, presumptuous, their Magic combin’d / Can picture the Charms of his Valentine’s Mind.” My reading is that this valentine was meant for a lady, and she should expect to marry a talented artist and poet who would idolize her for her character and intelligence. What do you think?
I broke my own rules for this project, I’m sorry to say. I was so eager to try out these designs that I didn’t work from primary source instructions or experiment with the tools of the period- I turned straight to an exacto knife and a plastic cutting mat. I have a lot more research to do on the craft of paper-cutting as it was practiced in the 18th and 19th centuries, and I’m sure I’ll be returning to it before long.
I chose a tough art paper for cutting, since I wanted it to stand up to lots of handling. Although Cobbold seems to have used mostly smooth wove paper in the JHU album, I worked with a laid-texture paper that I happened to have on hand. I free-hand sketched the designs with a soft pencil on tracing paper while looking at the Flickr images. Then I flipped the tracing paper over onto my art paper and rubbed over the pencil lines with a bone folder. I used the resulting lines as a guide for cutting from the back-side of the paper, while the front of the paper remains clean and white. As I worked on those delicate vines and flowers, I found that they weren’t as difficult to execute as I thought they would be. Each flower is formed out of simple petal shapes that are filled in with finely-cut lines. The vines are formed of repeating three-leaf motifs. All the extant valentines attributed to Cobbold are glued to red or pink paper, although in her description of the Valentine Lottery she only mentions wrapping them in “blue demy paper.” I have left mine unmounted for now, but I placed them on bright paper to get the best contrast for photos. I had so much fun with these two designs, I might just have to try out that Chameleon. I’ll share it if I do!
Thanks to all my readers for your patience as once again a short hiatus turned into a long gap in posting, especially if you sent me an email or comment while I was away. I’ll get back to you soon!
 I am already on my way to Louisville, Kentucky to a meeting of the Jane Austen Society of North America. But I’m so excited I just have to share a few pictures of this amazing project that my husband just finished. You may remember that he made me some small tools to help with my historical handwriting. For the past few months he’s been working on a much bigger object- a reproduction writing desk!
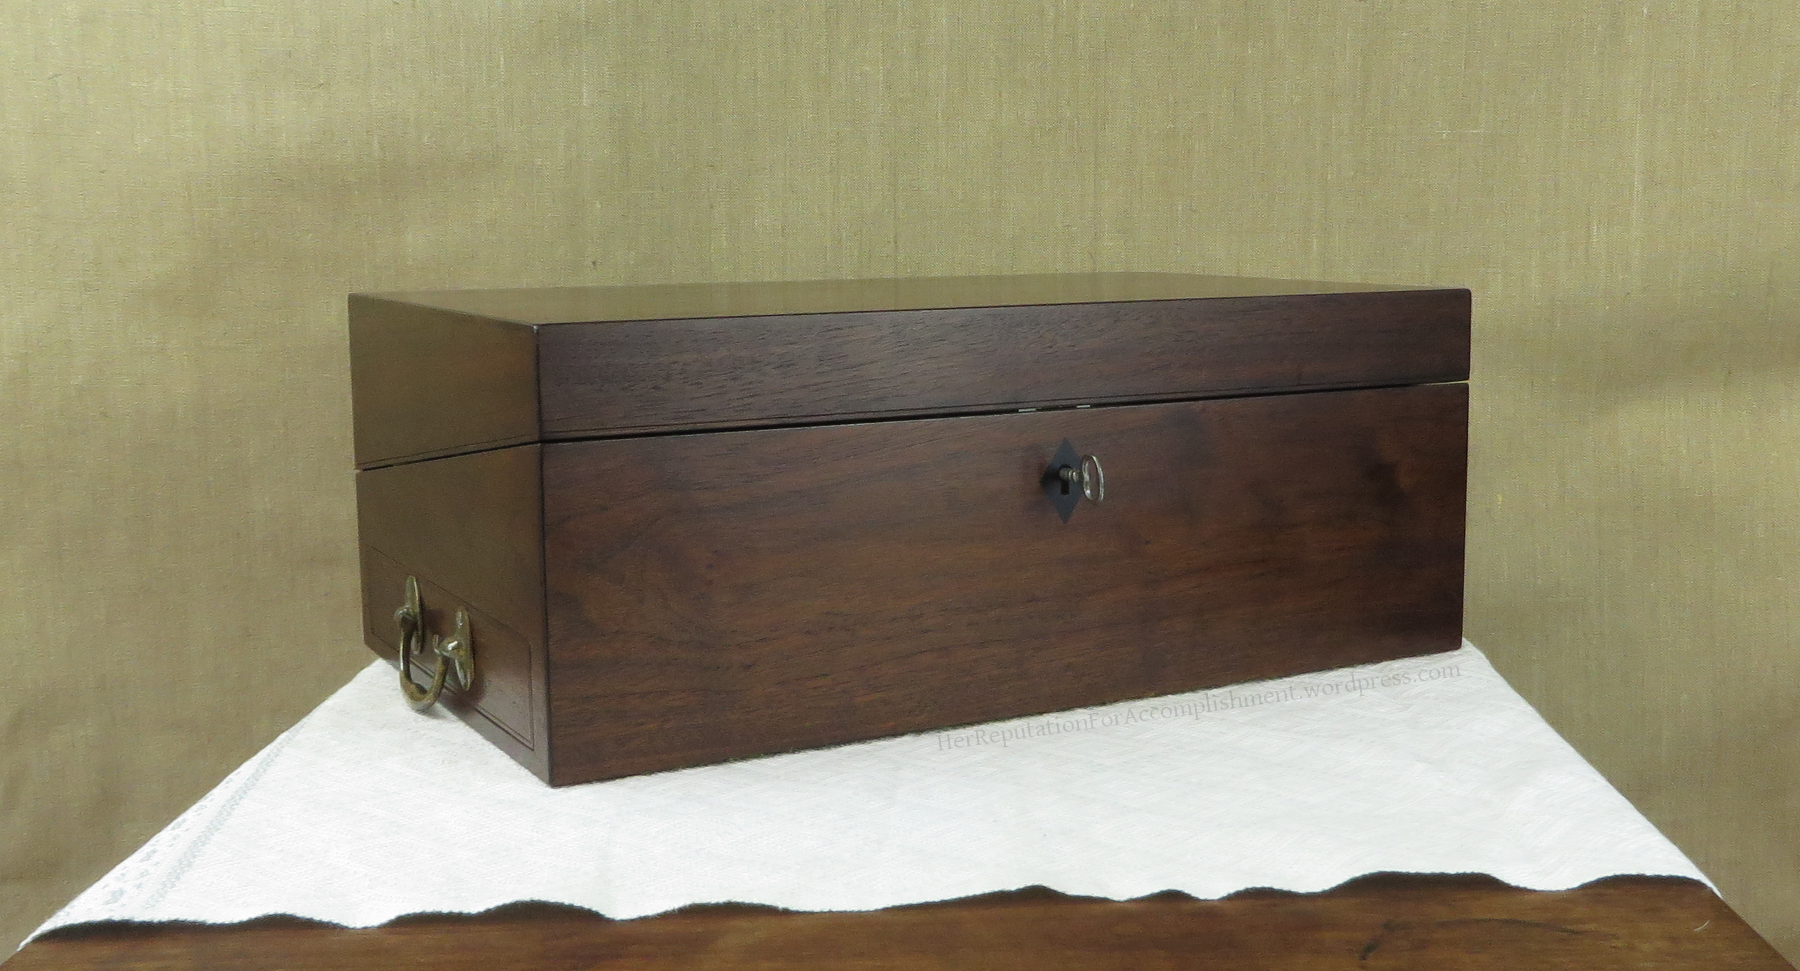
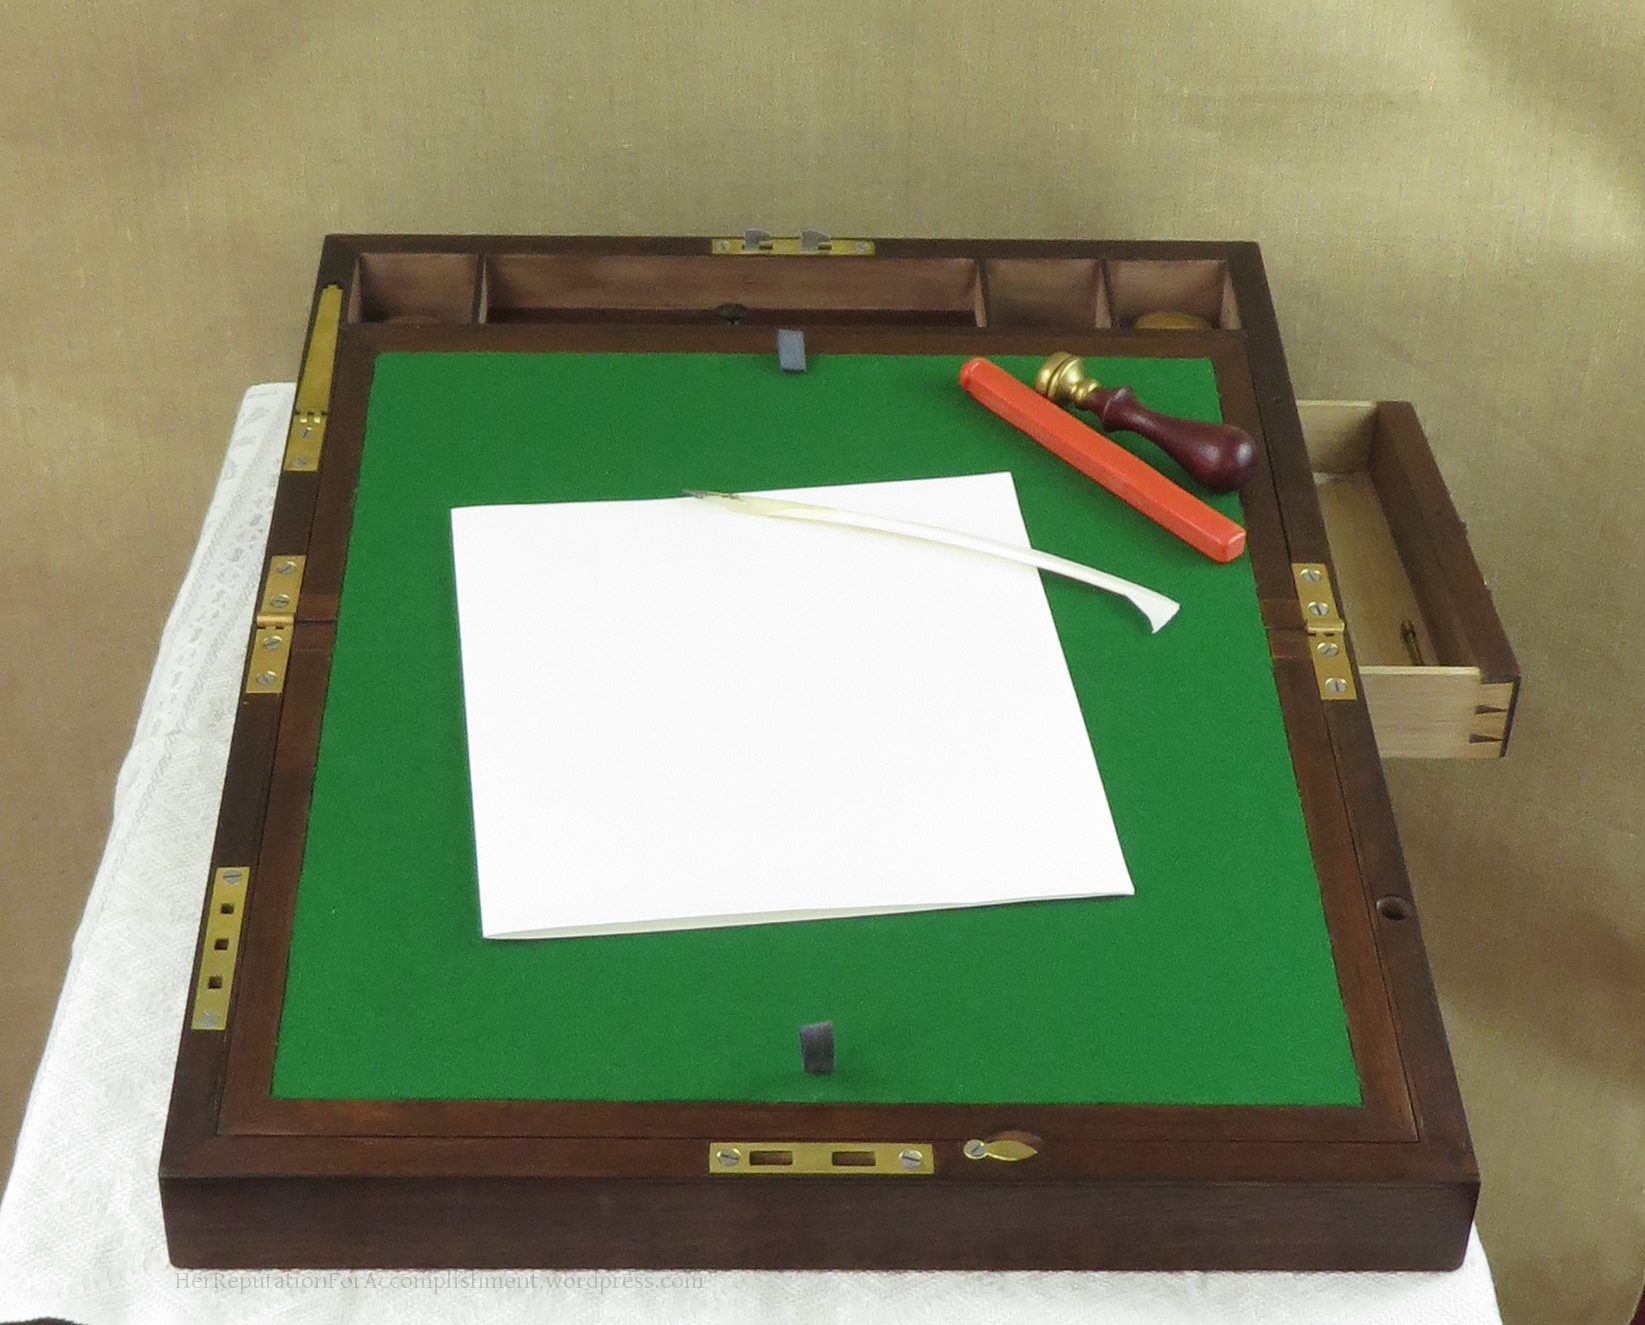 This reproduction is based on pictures of Jane Austen’s own desk, now in the British Library. Another important reference is the many detailed pictures on the Hygra website. We chose a green baize writing surface because it was a very common feature of historical desks, although Austen’s now has a leather surface.
Under the green writing surfaces are compartments for holding paper, letters, and other odds and ends, accessed by pulling up on the grey ribbon loops. A network of green ribbon on the flap helps organize the contents.
 Like Austen’s desk, it also has an extra feature. Hidden in that open compartment is a little reading stand which can be pegged into the lid of the box. A brass prop folds up so you can adjust the angle of the book you’re reading.
 My husband not only did all the woodwork, he also fabricated most of the brass parts! The handles, main hinges, and key are the only components he bought ready-made. He even made the lock! If you can’t tell, I’m over the moon and just so impressed with his craftsmanship. I am itching to use it, but also anxious about the first inevitable scratch or ink-blot- rather like a new car!
According to the records of Ring Brothers in Basingstoke, Jane Austen’s father bought “a Small Mahogany Writing Desk with 1 Long Drawer and Glass Ink Stand, Compleat” on December 5 in 1794- just in time for Jane’s birthday on December 16! The price he paid was twelve shillings. Now how can I scrape together 12 shillings these days?

I’ve been thinking about Jane Austen’s Persuasion lately- maybe because autumnal weather puts me in mind of Austen’s most autumnal novel, or maybe because I’m heading to North America’s largest meetup of Jane Austen fans and scholars later this week. Since I worked on letter-writing this summer, I decided I just had to make my own version of the famous letter that reunites Captain Wentworth and Anne Elliott.
It’s one of my favorite scenes in all the novels: Anne’s conversation with Captain Harville, passionately defending women’s constancy in love – Wentworth covertly writing what he feels while he listens to her words – the sudden change in Anne’s feelings as she realizes that he has understood her and has finally broken his silence about their shared past.

And of course the letter itself is a joy to read, with unforgettable phrases like ‘I am half agony, half hope.’ Captain Wentworth’s writing is a means of participating in the conversation he overhears, and Austen’s representation of the text suggests that he begins the letter without any of the usual formalities. He just puts his pen to paper and pours out his heart. I chose a running hand for my version of his letter. It seemed most appropriate for a Naval captain who writes so many logs, ledgers, and official reports.
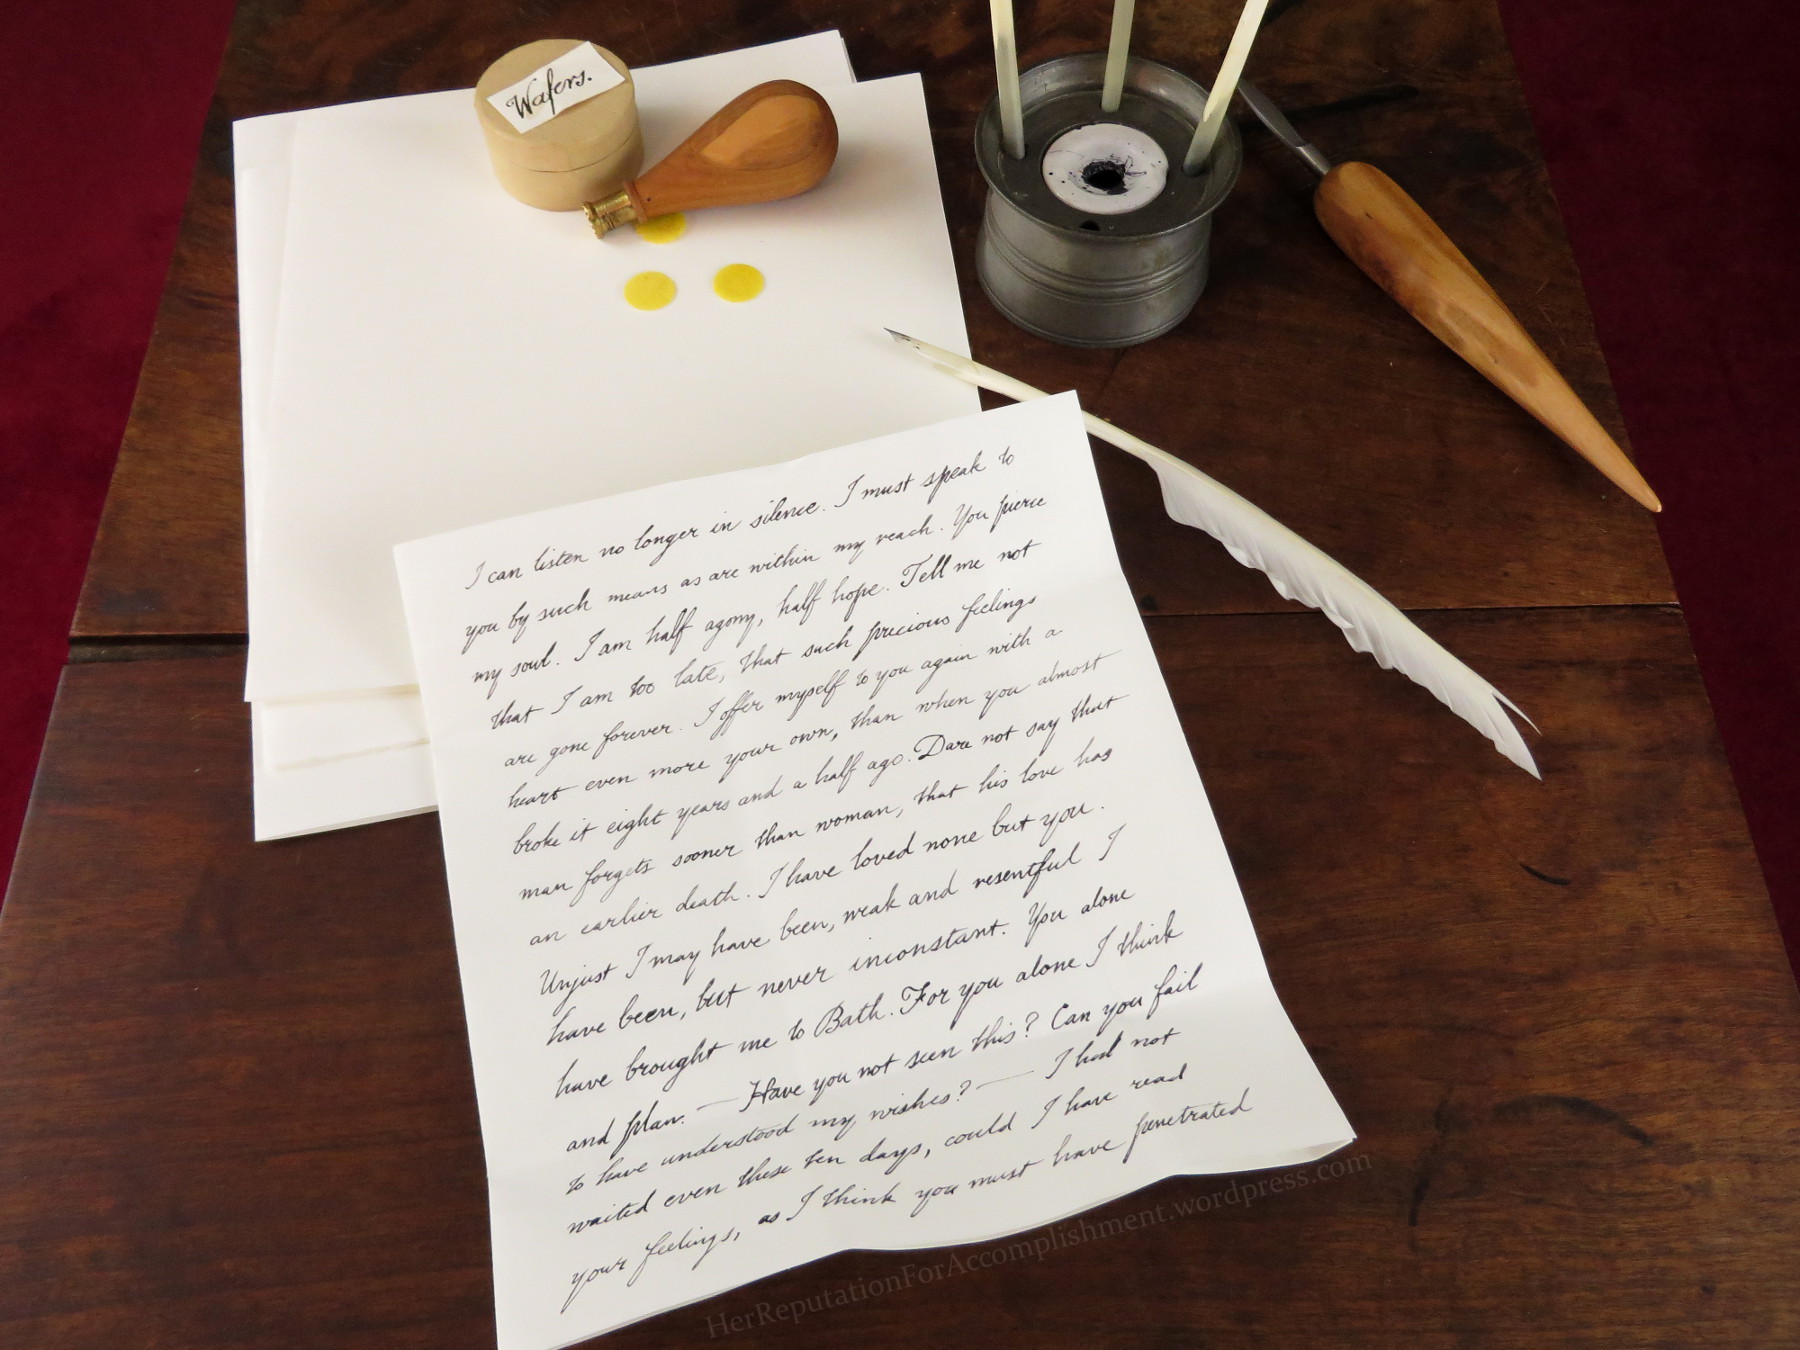
I tried to express Wentworth’s speed and furtiveness with my increasingly messy writing- at one point he adds “I can hardly write.” He does finish his letter a little more conventionally than he begins it, with his initials and a post-script.

The physical features of the letter itself are only barely described- we only learn that it’s hastily folded, hastily sealed, and almost illegibly addressed. I decided to seal this letter with one of the yellow wafers I made, since that is the hastiest and least conspicuous means of sealing a secret love note.
 I haven’t opened the seal, but when I do I will imagine myself in Anne Elliott’s place, devouring the words of this most romantic of letters. For now I will tuck it in my writing desk as a little Persuasion keepsake. Do you have a favorite letter from Jane Austen’s novels? One which you would most like to receive for yourself? Let me know in the comments!
 In just one week I’ll be attending my first ever Annual General Meeting of the Jane Austen Society of North America! The AGM takes place in a different city every year, so I feel very lucky that this year the location is just a few hours’ drive away from me in Louisville Kentucky.
I’m very excited by the different talks and presentations scheduled for the weekend. Amanda Vickery, historian and TV presenter, is one of the featured speakers! Since I don’t have any clothes appropriate to Jane Austen’s era (yet!), I won’t be participating in some of the festivities, like a promenade and ball.
Dear readers, are you joining the Janeites in Louisville? If so, I’d love to meet you in person! I’ll bring my calling cards! Or if you’ve ever been to past AGMs, do you have advice for a novice like me?
I missed this story when it first came out in July, but I think it’s far too interesting not to share! The video above was made by Christina Kobb, a Norwegian pianist who has been studying Viennese piano manuals from around 1820. She noticed that the instructions for the most basic aspects of technique- the posture of the body, arms, and fingers- were very different from those taught today. Based on her research, she re-trained herself to play piano using those historical techniques. What an accomplished lady!
My childhood piano lessons are far behind me, so I confess it is difficult for me to see in the video above exactly how her historical technique differs from modern styles. It’s clearest at about 10:00 and 15:00, when she plays the same pieces in two different ways. Dr. Kobb demonstrates that some movements required by early 19th century compositions are much easier using contemporary techniques. While what her performance gains from the historical practice is interesting, I’m struck by how similar the posture advised by music manuals is to the posture advised by writing manuals. In particular, the upright back with the elbow held close to the body matches the directions given in George Bickham’s Young Clerk’s Assistant:

This advice is echoed in many of the other educational guides I’ve read from the later 18th and early 19th centuries. For writing as for piano-playing, this posture seems to place focus on the fine actions of the fingers rather than larger movements of the elbow and wrists. Ergonomic considerations aside, the preoccupation with posture in writing and music manuals is also a reminder of the role these accomplishments played in teaching deportment. The term deportment is usually used now as nearly a synonym for etiquette or manners (at least in the US), but its original meaning has to do with elegant management of the body. In this period, grace, poise, and controlled movements were important signs of a genteel, “well-bred” person. It’s obvious that dancing might show off how graceful and well-trained a person was, but writing, playing the piano, and even needlework were also opportunities for displaying elegant deportment through posture and the movement of the hands.
Christina Kobb’s research gained wider exposure this summer due to an excellent New York Times piece about the science of music. Rolf Inge Godoy, a musicologist at Oslo University, filmed Dr. Kobb’s piano-playing using motion-capture technology (the same techniques that allowed Benedict Cumberbatch play Smaug in the recent Hobbit movies). Dr. Godoy will use the data he gained to quantify how historical techniques affect the sound of the music Dr. Kobb plays.
 Last week I described common sealing wafers and discussed some of the social rules about using them to seal letters in Jane Austen’s era. After learning about these once-ubiquitous little pieces of Regency life, I just had to try making my own.
It’s been quite an adventure, let me tell you! The extant recipes for wafers, like many culinary recipes of this period, don’t provide measurements and are short on detailed instructions. They are not aimed at people like me who don’t already know exactly what a wafer should look and feel like. I have done a lot of experimentation with different tools, techniques and formulations that I won’t detail here- I’m going to focus on what has worked best for me so far. It’s still a work in progress!

The recipe in the New Family Receipt Book of 1811 (NFRB) has the most detail and was often reprinted in other collections. I compared it to other recipes and descriptions from various time periods, and it seems to be a bit of a “kitchen sink” recipe: it includes all of the ingredients mentioned elsewhere and more. The most basic formula for wafers appears to be simply flour and water- the same recipe as the wheat paste still used by conservators and crafters for sticking paper together today.
See, for example, this 1902 book about making all kinds of adhesives. The author admits that wafers “are articles comparatively unknown to the present generation,” but provides a little information about making them anyway- out of flour, water, and coloring alone. He has vivid childhood memories of eating a bunch of colored wafers and seeing the doctor afterward due to the variety of poisonous colors used in them!
Anyway, my hunch is that the expert techniques and specialized tools of the industrial wafer-makers allowed them to get good results with the simplest recipe. I would guess the more elaborate NFRB recipe was designed to help DIY enthusiasts get results at home. I decided pick and choose additional ingredients from the NFRB recipe based on their properties rather than using them all.

Flour: I used the unbleached All-Purpose flour I have on hand for baking (1 in the picture above). It’s the one ingredient (besides water) that every recipe has in common.
Gum Water: Gum arabic is a plant-derived gum that gets sticky easily with moisture, so it’s a good addition to a lickable adhesive. Since gum arabic was sold coarsely ground or in lumps in the 18th and 19th centuries, it was commonly dissolved in water before being added to other recipes- like the “gum water” in the NFRB recipe. I used finely ground gum arabic (2), so I didn’t need to make gum water first. Gum arabic is used today to thicken ink, add gloss and body to watercolors, and in some cosmetic formulas, so it’s not hard to find from caligraphy suppliers, art stores, and natural cosmetics suppliers.
Isinglass is a very pure form of fish gelatin, originally derived from the swim bladders of sturgeon. It has a long history of use as glue as well as a clarifying agent in the beer and wine industries. Like gum arabic, dry isinglass glue rehydrates quickly. Since both ingredients seem to have similar properties, I decided to use gum arabic (which I have on hand) and omit isinglass (which I don’t). If you want to try it, check your local home-brew supplier.
Glair or egg white is often used by illuminators to help stick gold leaf to manuscripts (after it has been aged- I skipped that step). Since I want to “cook” my wafers like the professionals did rather than slowly dehydrating them, I don’t think egg will add useful stickiness. But after some experimentation, I decided to whip the egg white to a foam and use it to incorporate stable air-bubbles into the paste mixture, making the finished wafer lighter and easier to moisten (3).
Yeast: Although no rising time is indicated in the NRFB recipe, it’s possible that the yeast was added to lighten the batter with bubbles of gas. I decided to leave it out and let my egg white foam do that job.
Colors: I decided right away not to use toxic mineral pigments like the traditional vermilion, especially since I’m making wafers in my home kitchen! I tried a few different methods of non-toxic coloring, including yellow turmeric from my spice rack, red pigment based on iron oxide (4), and food coloring (5). They all worked well, although the combinations could get odd. When I used both turmeric and red iron oxide to try to approximate the brilliant orangey red of vermilion, I ended up with a batter that smelled vaguely of blood and curry. That experiment also included a lot of unbeaten egg-white that made the resulting wafer very rubbery. I dubbed that batch “the weirdest pancakes ever made”.
Tools and Techniques: The NRFB recipe suggests drying the mixture on flat tin plates in an oven, while the professionals used hinged “wafer tongs” heated over a fire. The tongs probably looked a lot like waffle irons of the same time period. I wanted my wafers to look like the professionally made ones, but a wafer iron is not easy to find! There are some stove top irons for making pizzelle and ostie (Italian pastries closely related to wafers), but none without some kind of waffley pattern. I eventually hit upon a makeshift solution: my own trusty cast iron skillet and a cast iron bacon press with a flat bottom (6). I heated both of them on my electric stove set a little above “Low”, greased them with butter, and used them to make thin pancakes that cooked quickly and had shiny, crisp surfaces on top and bottom (7). Higher heat browned and then burned the pancakes.
Since industrially made wafers were circular, I used round leather-punches (8) to cut individual wafers out of the pancakes. The wooden block pictured is a handy surface to punch into. Many sizes of wafer were available in the period- according to a conservation report on an Irish archive of documents dated 1818-1853, the wafers used ranged from 1.3 cm to 3 cm in diameter, or about half an inch to 1 1/8 inches. I used a 5/8 inch punch and a 7/8 inch punch. I found that if I let the pancake get too crispy, the wafers would crumble when I tried to punch them out. I had the best luck with thin pancakes that retained a little bit of moisture. I punched the circles out while they were still warm and then let them finish drying out on paper towel, which also absorbed any remaining grease.
Here’s the recipe that has worked the best with my tools and techniques, although I will continue to fine tune it:
Makes 3-4 thin pancakes, which yield a few dozen wafers (depending on the size of your punch)
1. Mix 3 Tbsp white flour with 1 Tbsp gum arabic powder (and any dry pigment you want to use).
2. Combine thoroughly with 3 Tbsp water, then let sit for at least a few hours to let the gum and starch hydrate.
3. Stir in any liquid coloring you’re using.
4. Separate one egg, discarding the yolk. Beat the egg white until white and foamy and the whisk makes soft peaks. Take 3 Tbsp of egg foam and gently fold it into the batter.
5. Pre-heat the skillet and bacon press to between Low and Medium Low (you’ll need to experiment with what’s right for your stovetop). I cover a second burner with foil and heat it up as well, then place the bacon press there to stay hot while I’m working with the batter.
6. Wipe a little butter on the pre-heated skillet with a paper towel and spread a heaping Tbsp of batter in the middle. Wipe a little butter on the bacon press and press it down onto the batter. Cook until the thin crepe has a crisp surface on both sides, but isn’t hard all the way through. If it begins to brown or burn, your temperature is too high. Punch or cut wafers from the pancake while still warm.
Does making wafers from scratch seem too involved, but you still want to give them a try? I admit it is a little odd to put so much time and effort into recreating an item that was the cheap, quick and easy alternative to sealing wax! I also experimented with a few methods of “faking” wafers with modern materials. Here are two which worked:
 Flying Saucers aka Satellite Wafers
The word “wafer” can refer to a number of confections and pastries, some of which are very closely related to sealing wafers. Flying Saucers, also sold in the US as Satellite Wafers, are one of those confections! They aren’t very common in the US, but are popular in the UK and the Netherlands. I caught sight of these candies (1) at my local international market and had to see if the wafer they’re made from would seal a letter- and it does! The saucer shape is made up of two domed sheets of light, starchy wafer that melt in your mouth. Inside is sour sherbet powder or candy beads.
To make sealing wafers, I use scissors to cut the seam holding the saucer together (2), then I eat the candy inside (3)- this is much more fun than blood-and-curry pancakes! I use the same leather punches to cut perfect circles from the wafers (4), but you could also use scissors. The domed shape of the saucer is more obvious with the large wafer (5), so I prefer making smaller ones (6). The light wafer moistens very quickly when licked, and sticks beautifully! The pastel colors are not the most typical choices for wafers of the 18th and early 19th centuries, but they’re not implausible.
 Wafer Paper
If you’ve seen cookies or cakes decorated with a painting or a photograph, you’ve probably seen wafer paper in action. It’s a very thin, white version of the same starchy wafer that Flying Saucers are made of. Traditionally used as a base for other candies like Italian torrone, wafer paper is now printed with food-safe inks to make those vivid, intricate decorations. I bought a package of blank sheets from an online store that specializes in wafer paper decorations, Fancy Flours. It’s so thin it will practically disappear into moist icing, which makes it a little tricky to use as a sealing wafer. One lick and it turned to goo on my finger! I got better results by doubling up the wafer paper. I brushed one square with a very small amount of water (1), then placed another square on top and rubbed it to get a good seal.
White wafers are perfectly period, but I wanted to try coloring the wafer paper too. Since it reacts so quickly to moisture, brushing on wet food coloring just made the paper melt. In the end, I resorted to alcohol ink (2), which added a lot of color without melting the paper (3). However, alcohol inks are not food-safe so wafers colored with them are not lickable. I used the same leather punches to cut out circles (4), but I imagine paper-punches for scrapbooking would work equally well.

As I mentioned last week, people who used wafers to seal their letters often applied pressure to the moist wafer with a wafer seal. The distinctive hob-nail or waffle pattern of the wafer seal helped the paper bite into the paste. The pattern could be filed into lots of different tools made out of different materials- you can see some antique tools on my Pinterest board about sealing wafers. My husband and I cobbled together a convincing seal with brass parts designed for other purposes and a wooden handle he turned on his lathe. If you’re feeling crafty, you can use a triangular file to add this pattern to a blank seal, a hardwood dowel, or a piece of metal stock.
Luckily, there’s also a historical alternative to the wafer seal! When I look at images of Georgian and Regency letters online, I keep my eyes peeled for the tell-tale marks of the wafer seal. I did a double take when I saw this 1803 letter on ebay: instead of the diamond hobnail pattern, the wafer was pierced several times with a needle or pin! That this was not an uncommon practice is confirmed by an etiquette book of 1833 which states:
It is only conscripts, and peasants, who fold a letter like an apothecary’s packet, who omit to press the wafer with a seal, or secure it by pricking it in every part with the point of a pin.
An American travelogue from 1838 describes a reading a lady’s letter from the 18th century that was sealed in this way:
One little thing about the exterior of her letter bespeaks its feminine authorship, and carries us back as by a magic power, through a hundred years. Some thirty or forty pin-holes are stuck into the wafer of the letter, the fair and worthy writer apparently not having a seal at hand.
A wafer certainly is a “little thing,” but for me it’s those littlest details that carry me “back as by a magic power” through the 200 years that separate us from Jane Austen’s era. However you choose to seal your letters, I hope you’ll give some thought to the humble wafer!
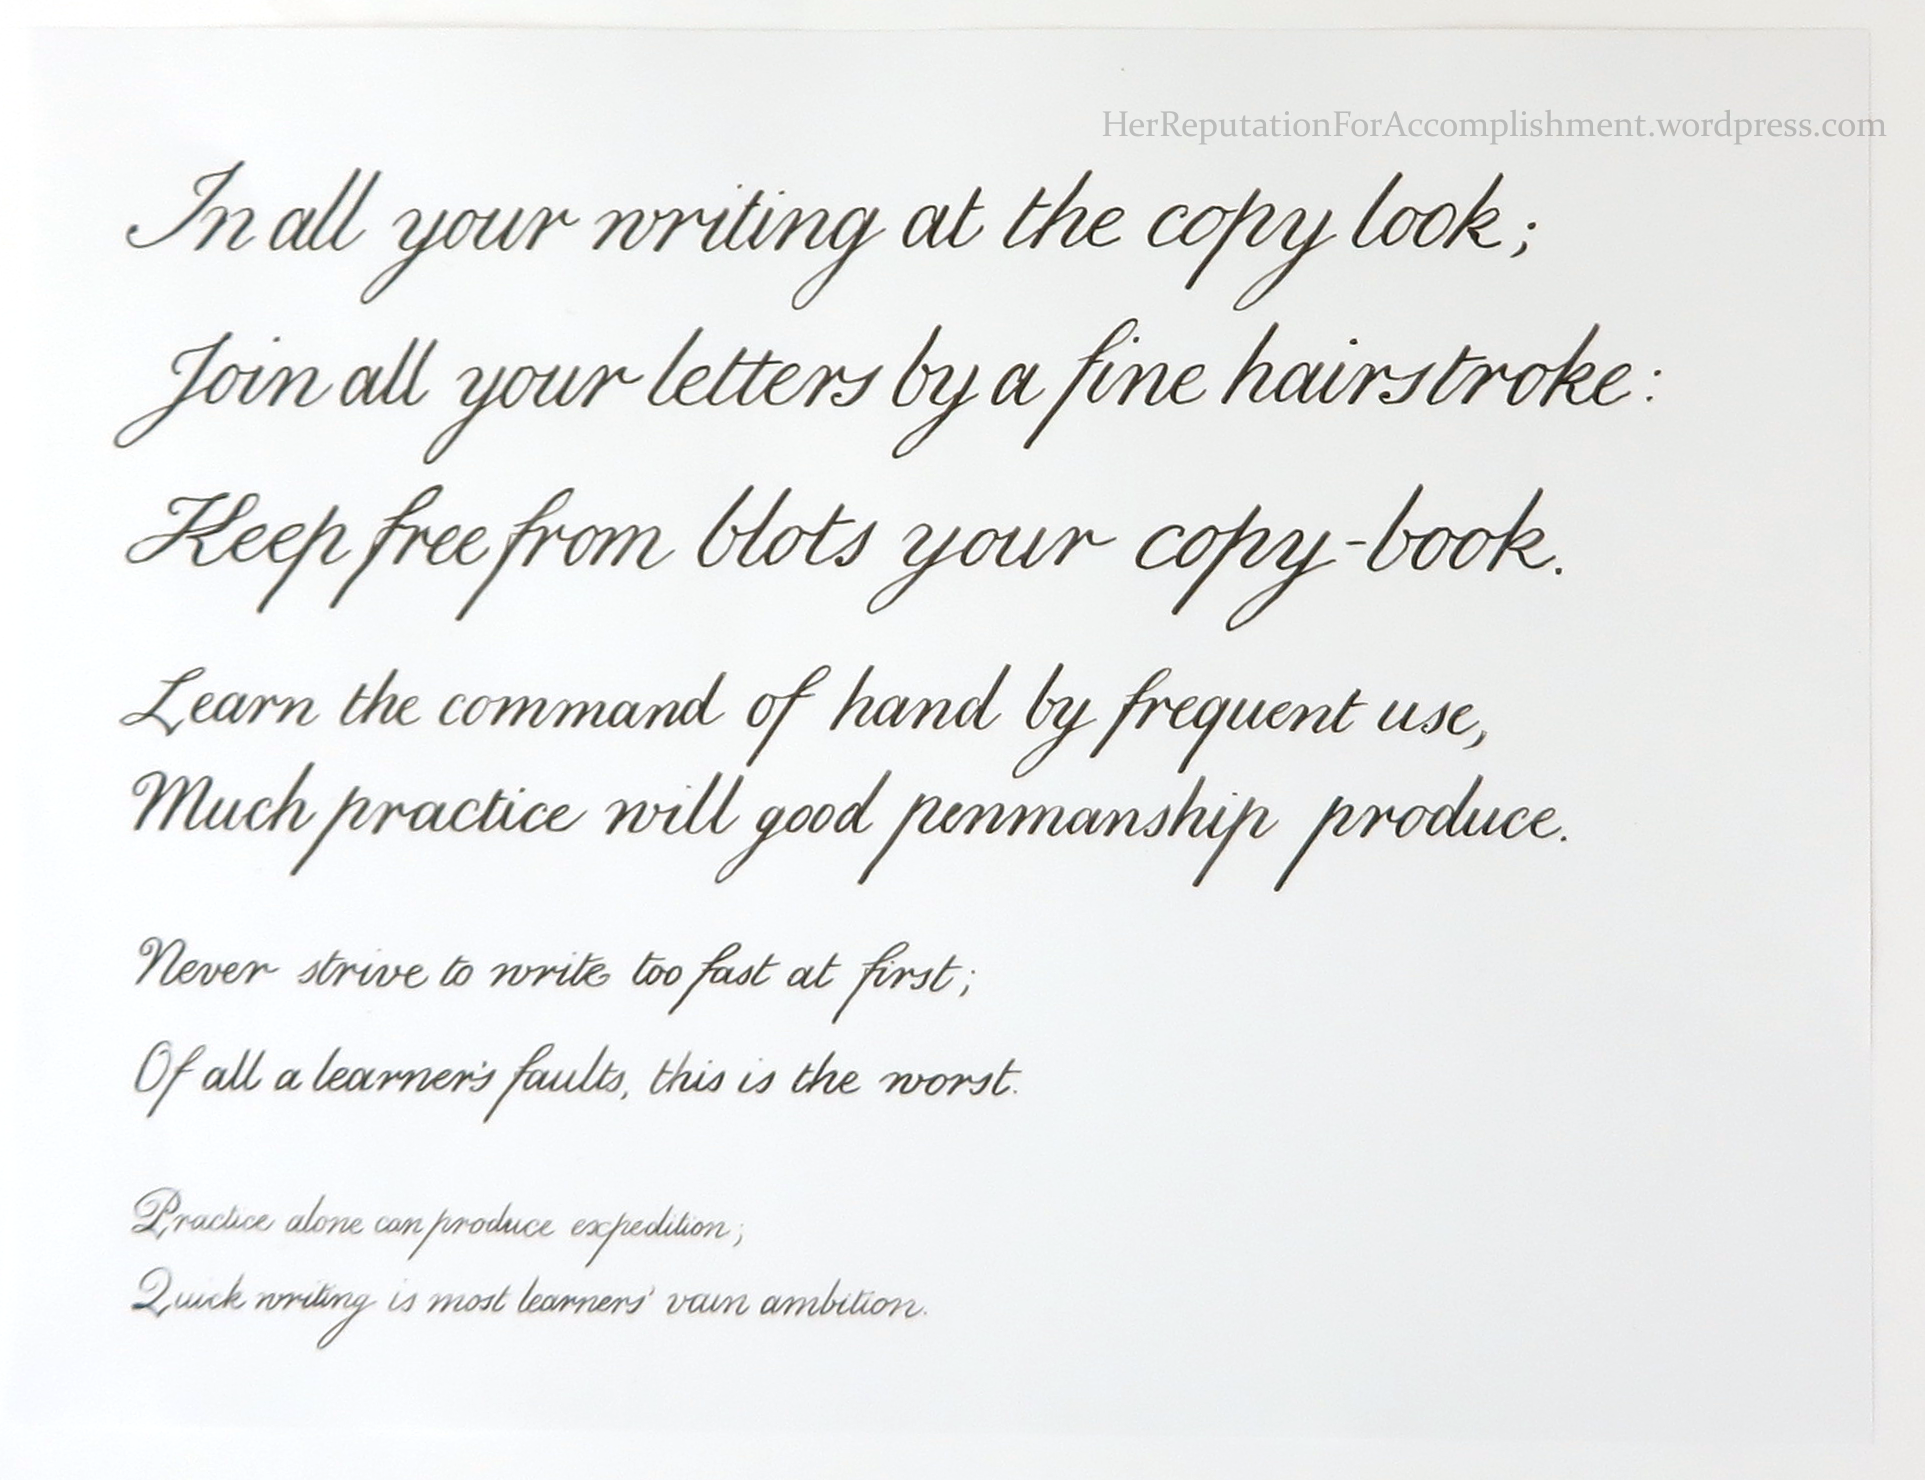
 I haven’t shared any of my penmanship practice for such a long time, I thought I’d do so today. I’ve had my fill of the moral maxims that are usually recommended for practicing English Round-hand, so I was delighted to find a different sort of text in The Accomplished Tutor or Complete System of Liberal Education by Thomas Hodson (3rd ed, 1806). Most of the chapter on penmanship is nearly identical to other Young Man’s Companion books- plagiarism and piracy were apparently common in this sort of publication! The “Copies for Round Hand” provided for Round Hand practice stands out, however. Rather than a collection of wise sayings on vices and virtues, it’s a doggerel verse with advice about penmanship practice! Each verse starts with a different capital letter:

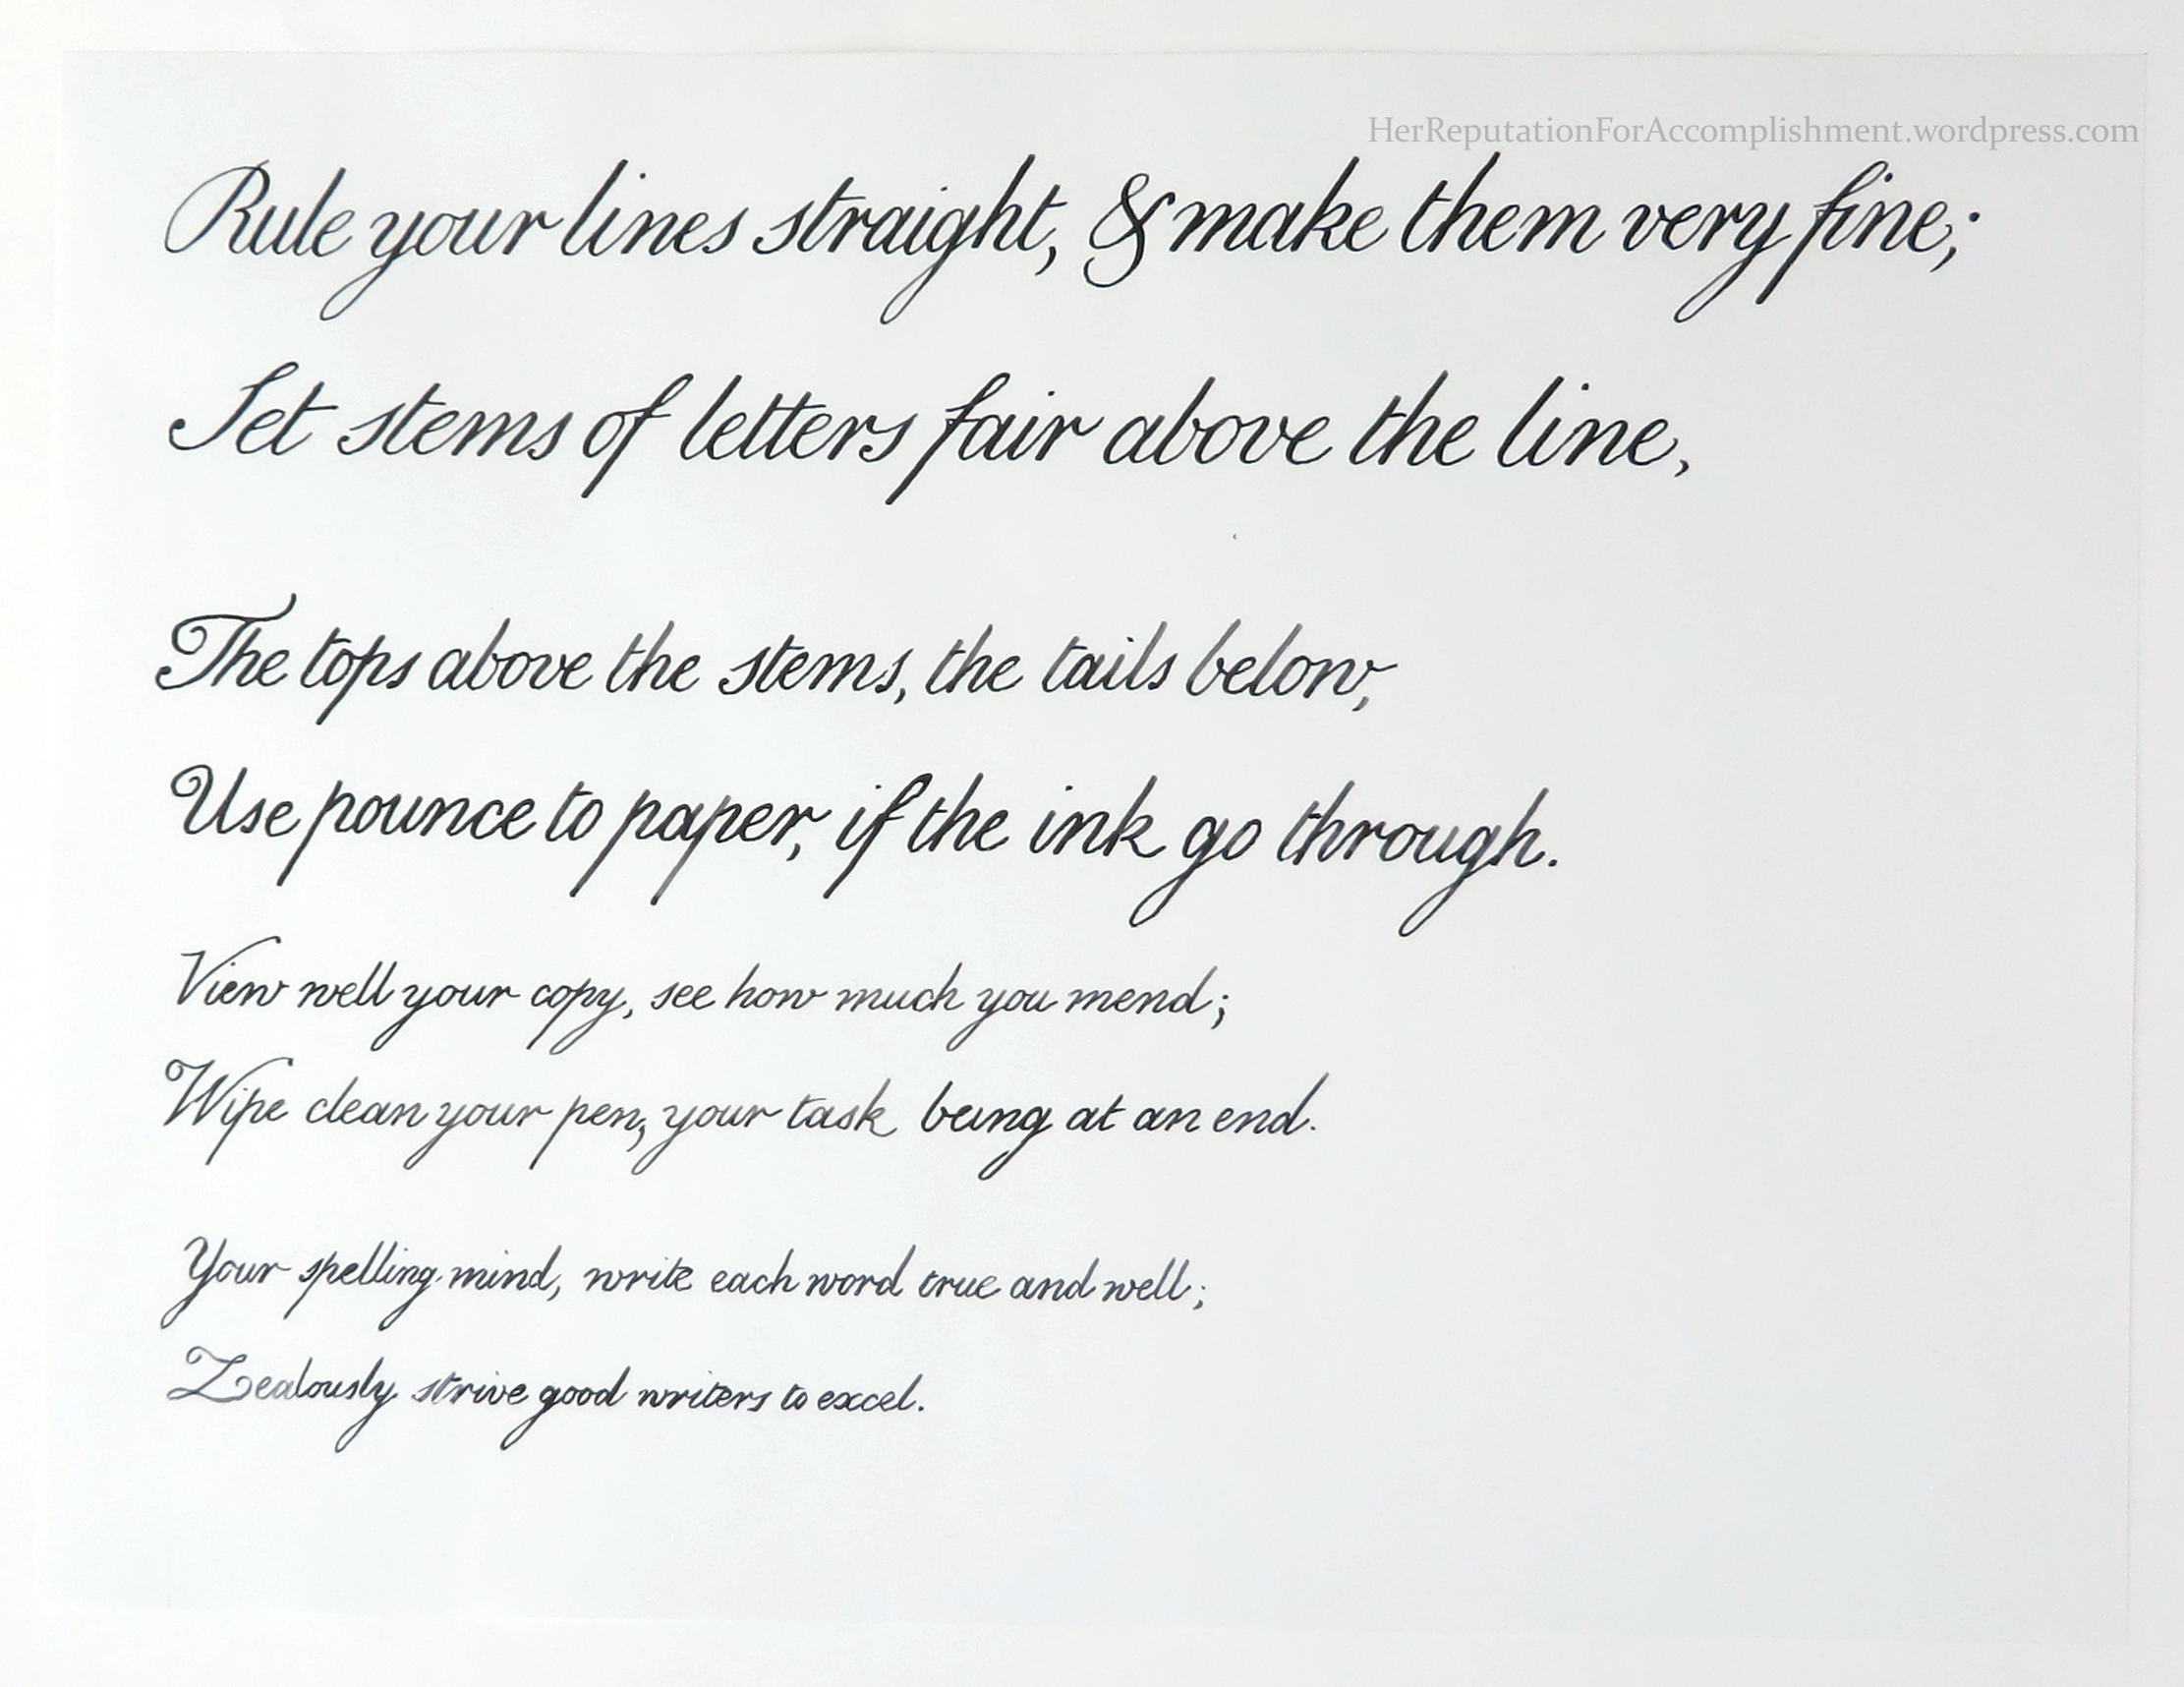
Changing from a large copy hand to a style suitable for letter-writing was a challenge, so I decided to use these verses to practice writing Round-hand at different sizes. Students who made school pieces for showing off their penmanship often demonstrated their versatility with several different sizes of writing. I followed their lead and wrote the first couplet on each page quite large, then made each successive couplet smaller.
It took me a little bit to understand what that bracket means connecting the three verses starting with I, J, and K. The rest of the poem is in couplets, but these three lines make a trio! I suspect that an earlier version of the poem left out a verse starting with J. That’s pretty common in the alphabetical exercises I’ve seen, perhaps a holdover from a time when J was just a variant form of I. Someone decided this poem needed a line about J, so they wrote a line that sort of rhymed with the I and K verses and just stuck it in there.
Without the J verse, the poem would have had an even number of lines because the original writer also left out a line about X. I can’t blame them, since there’s just no way to write about penmanship with words starting with X! Most other alphabetical exercises resort to names from Greek history: “Xenocrates was learned” or “Xenophon was a great captain as well as a philosopher.” George Bickham hit upon an odd solution. He used words that start with Ex- and put a capital X in front of the line: “X, Excess kills more than the sword” and “X Examples sway more than Precepts.”
 When I compare these lines to the last time I shared my copy-book hand, I’m happy with my progress! I can see a lot of room for improvement, however. Somehow I see many more flaws in the photographs than I did when looking at the pages themselves!
Earlier this week, I described the humble wafer– a dry paste disk that provided a quick and easy alternative to sealing wax. With two different methods for sealing letters available, how would a letter writer choose between them in Jane Austen’s era? What did the choice of sealing wax or wafer mean to the recipient of a letter? That’s what I’ll be looking at today!
Letter-writing manuals, like the Complete Letter-Writer of 1778, suggest that sealing wax, along with other fancy stationery, shows deference when writing to someone of higher class status:
Letters should be wrote on Quarto fine gilt post paper to superiors ; if to your equals or inferiors, you are at your own option to use what sort or size you please, but take care never to seal your letter with a wafer unless to the latter.
(See my post on the Anatomy of a Regency Letter for info on paper terms like ‘post’ and ‘quarto’) So, when Jane Austen was writing to her beloved sister Cassandra- an equal in status as well as a beloved family member- she sometimes chose a wafer, sometimes sealing wax. In Maria Edgeworth’s 1814 novel Patronage, this point of wafer etiquette is at the center of a political contretemps!

One of the central characters of the novel is the politician Lord Oldborough, who is excellent at administration but “sometimes guilty” of “trifling failures in etiquette” that might offend influential people who take pride in their high rank. On one occasion, Lord Oldborough accidentally offended the conceited Duke of Greenwich, his social superior (chapter 8):
Lord Oldborough had sent his grace [the Duke] a note, written in his own hand, sealed with a wafer. The clerk, who was present when the note was received, said that the Duke’s face flushed violently, and that he flung the note immediately to his secretary, exclaiming, ‘Open that, if you please, sir—I wonder how any man can have the impertinence to send me his spittle!‘
Ew! The spittle that moistened the wafer, it turns out, is not the real cause of offense, but the lack of respect that Lord Oldborough’s informal note implies. Commissioner Falconer, a wily man who is trying to curry favor with Lord Oldborough, comes up with a sneaky way to soothe the displeased Duke (chapter 8):
When Commissioner Falconer had thus sagaciously discovered the cause of the noble duke’s displeasure, he with great address applied a remedy. Without ever hinting that he knew of the offensive circumstance, having some business to transact with the Duke, he contrived, as if undesignedly, to turn the conversation upon his friend Lord Oldborough’s strange and unaccountable negligence of common forms and etiquette; as a proof of which he told the Duke in confidence, and in a very low voice, an anecdote, which he heard from his son Cunningham, from Lord Oldborough’s own secretary, or the commissioner protested that he would not, he could not have believed it—his lordship had been once actually upon the point of sealing a note with a wafer to one of the royal Dukes!—had the wafer absolutely on his lips, when Cunningham felt it his duty to take the liberty of remonstrating. Upon which, Lord Oldborough, as Commissioner Falconer said, looked with the utmost surprise, and replied, ‘I have sealed with a wafer to the Duke of Greenwich, and he was not offended.’
Falconer calms the Duke’s wounded pride by explaining that Lord Oldborough did not single him out for disrespect with his wafer-sealed note, but is unaware of standard conventions. He also subtly implies that Lord Oldborough has more respect for the Duke of Greenwich than for the Royal Dukes, the King’s younger sons. Strictly speaking a Royal Duke has a higher rank than the Duke of Greenwich, but in Falconer’s story Lord Oldborough seems to say that if a wafer is good enough for the Duke of Greenwich, it’s more than good enough for a Royal Duke! Falconer’s well-crafted anecdote does help reconcile the two politicians, and Lord Oldborough takes greater care with his correspondence to the Duke in future. In fact, he seals his next letter in wax with a special private seal: “—a seal that is always locked up—a seal never used to any common letter, never to any but those written by his own hand to some private friend, and on some very particular occasion” (chapter 38). I don’t want to spoil the novel for you, so I’ll just say that these choices about sealing letters have far-reaching consequences!
A quite different story shows a related aspect of wafer usage: since they are so easy and quick to use, a letter sealed with a wafer looks hurried and messy compared with an elegant wax seal.

In James Stanier Clarke and John M’Arthur’s 1809 biography of Horatio Nelson, the great hero of the Royal Navy, they describe letters that brought an end to the Battle of Copenhagen in April 1801. After the British had decisively gained the upper hand, Nelson wrote a note to the Crown Prince of Denmark offering a truce to prevent further bloodshed and destruction. In this version, all that is said about the seal is this:
and in order to shew that no hurry had ensued upon the occasion, he sent for a candle to the Cockpit, and affixed a larger seal than usual.
Nelson did not have any candles in the stern gallery where he was writing since open flames were carefully controlled in a ship of war, especially during a battle when gunpowder was in use. No mention of wafers here, but like all stories about Lord Nelson there are many variations in contemporary sources! A more elaborate version of the story is found in Robert Ker Porter’s book Travelling Sketches in Russia and Sweden, excerpted in the Edinburgh Review in April of 1809. There may well be earlier sources for this version, but this is the first I could find.
Whilst his Lordship was writing with all the calmness of a man in his study, he desired Colonel Stewart to send some one below for a light, that he might seal his dispatch. Colonel Stewart obeyed ; but none appearing with a candle ; when Lord Nelson had nearly completed his letter, he inquired the reason of such neglect, and found that the boy who had been sent for it was killed in his way by a cannon shot. The order was repeated : upon which Colonel Stewart observed ‘Why should your Lordship be so particular to use wax? why not a wafer? The hurry of battle will be a sufficient apology for the violation of etiquette.’ ‘It is to prove, my friend,’ replied Lord Nelson, ‘that we are in no hurry ; that this request is not dictated by fear, or a wish on our part to stop the carnage, from the least apprehension of the fate of this day to us, that I am thus particular. Were I to seal my letter with a wafer, it would still be wet when it reached the shore ; it would speak of haste. Wax is not the act of an instant ; and it impresses the receiver accordingly.’ The reasoning of the admiral was duly honoured by the result. The Danes acceded to his proposal ; and a cessation of hostilities was the consequence.
Colonel Stewart speaks of a “violation of etiquette”, since the Crown Prince of Denmark is definitely Nelson’s social superior. But Nelson isn’t thinking of etiquette. Even though he is actually in a bit of a hurry – cannon shot is killing people on his ship while he’s writing! – he takes extra time to make an especially large and impressive seal to show that he’s in control of the situation.

Although wafers, plain and fancy, continued to be available as the 19th century wore on, it appears that etiquette began to frown on them more sternly. An 1844 book for children charmingly titled The Writing-desk and its contents; taken as a text for the illustration of facts in natural history and philosophy has this to say about them:
Amongst the other contents of the writing-desk I must notice the white wafers, which are very useful for fastening loose sheets of paper together, though some people employ them for closing the envelopes of letters; but this, except in the ‘hurry of business’ is a slovenly practice.
It seems that wafers have moved down the social scale and are no longer appropriate to use even when writing to “equals and inferiors,” unless the writer is in haste. “Hurry of business” sounds a touch disdainful of tradesmen and other businesspeople, doesn’t it? The author, Thomas Griffiths, goes on to tell another version of the Nelson story (naming no names) and gives a clear account of how wafers are made and coloured, so they are definitely still an essential part of the writer’s tool-kit however down-market they may be!
I hope you’ve enjoyed learning about the humble wafer. Next week I’ll write about how I have made some wafers and wafer substitutes for sealing letters.
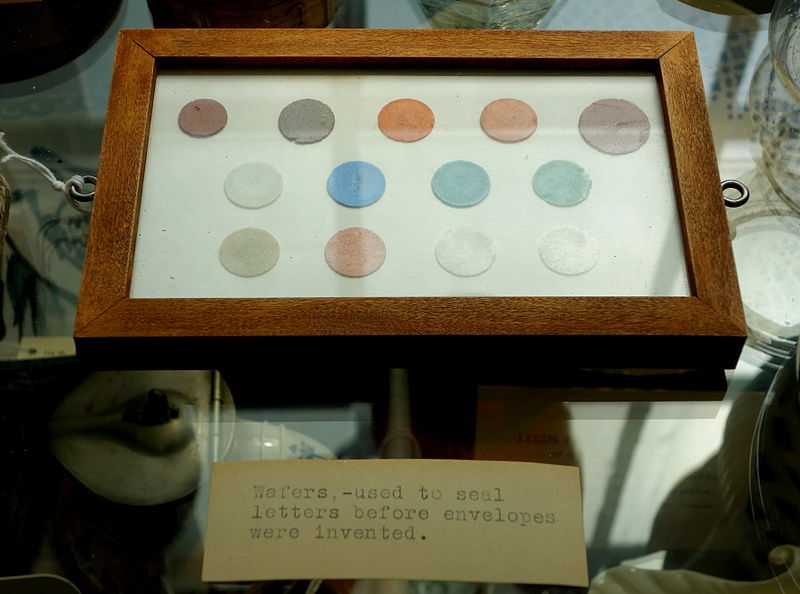
When we think of the romance of Regency letters, we think of sealing wax. Using it seems like a ritual that brings past times before our senses: the flickering candle, the smell of melting wax, the richly colored puddle impressed with a coat of arms or initials. But so many of the resources I’ve been looking at refer to two alternative ways of sealing letters in one breath: “wax or wafer.” I had to learn more about the wafer. I was astonished to learn how ubiquitous sealing wafers once were, and how nearly forgotten they are now!
Wafers are difficult to research for a number of reasons. The word “wafer” can mean many different things in different contexts: a biscuit like a thin waffle, a communion host, or a silicon base for making computer chips, to name just a few. In addition, different methods for sealing letters proliferated over the course of the later 19th century, including embossed and decorated gummed labels or stickers- also often called “wafers”. Even now, “wafer ‘ is a term for the translucent stickers used to close brochures and sales flyers for mailing! Entick’s dictionary of 1791 gives three basic definitions that illustrate this problem:
 What I want to focus on is the last wafer in Entick’s entry: “paste made to close letters.” This was sometimes called the “common wafer” to distinguish it from fancier variants. The common wafer was very simple: a thin disk of dry paste that becomes sticky when wet.
How wafers were made gives us a sense of their properties. Recipes for making wafers at home are readily available in the many “receipt-books” that borrowed (or pirated?) from each other. Here’s one from the New Family Receipt Book of 1811:.
To make Wafers Take very fine flour, mix it with the glair (or whites of eggs) isinglass, and a little yeast; mingle the materials, beat them well together, spread the batter, being made thin with gum water, on even tin plates, and dry them in a stove; then cut them for use. You may make them of what colour you please, by tinging the paste with Brazil or vermillion for red ; indigo or verditer, &c. for blue ; saffron, turmeric, or gamboge, &c. for yellow.
In other words, a starchy flour paste is combined with other sticky ingredients and colorants to form a thin batter, which is baked as a thin sheet and then cut into small pieces. While I haven’t found detailed descriptions from my period of how the commercial product was made, the encyclopedias of the later Victorian era (a great age for encyclopedias!) fill in the picture. Charles Tomlinson’s Cyclopedia of Useful Arts of 1866 describes a process that sounds like a scaled-up version of the home recipe, using the same ingredients with more specialized tools and techniques:
 (If you’re interested in the fancy wafers of various kinds, Tomlinson describes some of those too). The toxic “mineral colours” mentioned probably include vermilion, now known as mercury sulfide. It gave sticks of sealing wax (and apparently some wafers) their typical vivid orangey scarlet red color. I can imagine that if you’re making a product out of flour with some grease on your tools (some recipes recommend butter!), it would be convenient to include a toxic ingredient as a kind of preservative to keep vermin away. But, really, if the scraps from industrial wafer production were sold as rat poison, who would want to lick a wafer to stick it on their letter? Apparently, no one was worried!
Once I started looking for wafers, I found mentions of them all over publications from this period. In a tutorial for copying drawings in that same 1811 New Family Receipt Book, wafers are used to stick paper to boards and to other papers. An 1847 book of craft projects for girls describes making rosettes out of bits of wafer to decorate baskets. A 1799 book of home remedies advises using “The common wafer made use of for sealing letters” to remove corns from the feet. The treatment sticks on the problem area by itself! All these different uses suggest that wafers were ubiquitous- the reading public was expected to have them on hand.

To use a wafer, a letter writer folded up the paper as usual (see my post on the Anatomy of a Regency Letter for one letter-folding technique). Then the writer took a wafer from his or her writing desk or the “wafer box” that sometimes stood beside the ink-pot in a desk stand or standish. After licking it well, the writer stuck the wafer to the letter and folded the flap closed.
Once I knew what to look for, I found wafers on many letters from Jane Austen’s era- on letters Jane wrote, no less! Even if you’re looking at images online that don’t show the whole letter in detail, the perfectly round shadow of a sealing wafer is often very distinctive- even expert sealing-wax users rarely make a perfect circle of wax. Another thing to look for is the tell-tale mark of the “wafer seal”. While the wafer was still moist, a cross-hatched tool was often pressed into the paper to help it bite into the softened paste. The waffled seal impressed a distinctive pattern of little points or diamonds in the paper.

Many antique desk seals and seal fobs have this “hob-nail” pattern instead of an elaborate (and expensive) engraved insignia, and sometimes etuis or travelling inkwells were marked with the pattern, like this elegant silver penner. A wafer seal could easily be used on sealing wax as well. Occasionally I’ve seen letters where a more elaborate seal was used to press down the wafer, leaving a faint trace of the initials or arms- this may have inspired the fancy embossed stickers of later years. In any case, even when the letter’s seal has been ripped or worn away, sealing wax and wafers can sometimes be distinguished because of their placement on the page: sealing wax was daubed across the flap of the letter, while the common wafer was slipped under the flap.
When was it socially appropriate to use a wafer on your letter? How can YOU make (or fake!) wafers to use in your own period letters? I’ll cover those topics in upcoming posts!
